11/25/13, by Cate Seiser
Behind the Scenes
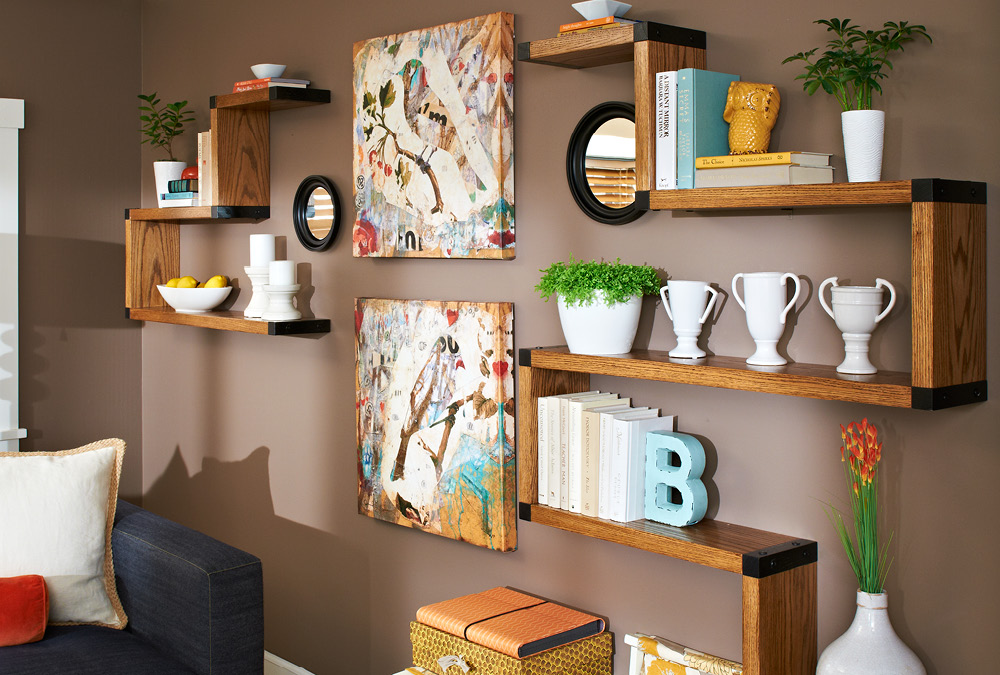
Project designer Jim Downing shares the inside scoop on the process of designing the Custom Wall Shelf System featured in Free Issue No. 1.
Q: What inspired your idea for the unique floating shelves?
A: Floating shelves are typically attached to the wall with some sort of hidden bracket, giving the illusion that they’re floating on the wall. That hidden bracket is both the magic and the weakness, since floating shelves sometime sag if overloaded. To prevent sagging, I decided to add a vertical element to the shelf, and then, the light bulb came on. Why not continue this horizontal and vertical pattern across the wall — forming the organic feel of a growing tree limb?
Q: How did you begin the designing process?
A: The shelves needed to be sturdy, and gluing two boards together to form a 1½”-thick shelf was a good way to accomplish that. I also needed a simple way to connect the shelves. Screwing a 2x2 block to the shelf as well as the vertical ended up being both simple and attractive.
Q: What’s involved in actually building a project for the first time — before there are complete plans with instructions (like readers get)?
A: Trial and error. Building multiple prototypes. Searching for a good balance of style and simplicity.
Q: Did you stick to your general plan or did the concept evolve?
A: Once the rest of the team weighed in, my original design evolved a bit. We decided to paint the connector blocks black for contrast, and since the screws I chose weren’t attractive enough (really!), we swapped them out for Headlok fasteners. As it turned out, the new hardware was very nice looking and awesome strong!
Q: What’s your favorite thing about the project?
A: The connector blocks! My first concept was to miter the corners where the shelf changes from horizontal to vertical. But mitering a thick, wide shelf proved to be a big challenge. Using the connector blocks — with simple straight cuts — made the whole thing much easier. The blocks are also cool because they allow the flexibility to re-configure your shelf system.


