04/30/14, by Cate Seiser
Tools, Tips & Techniques
You're not alone if you've fired up a drill/driver without recognizing anything but the trigger. Whether you wound up frustrated, puzzled, or relieved, it's better to take a minute to become familiar with the tool's components. Then, with the drilling and driving tips provided below, you'll be able to complete your projects with confidence.
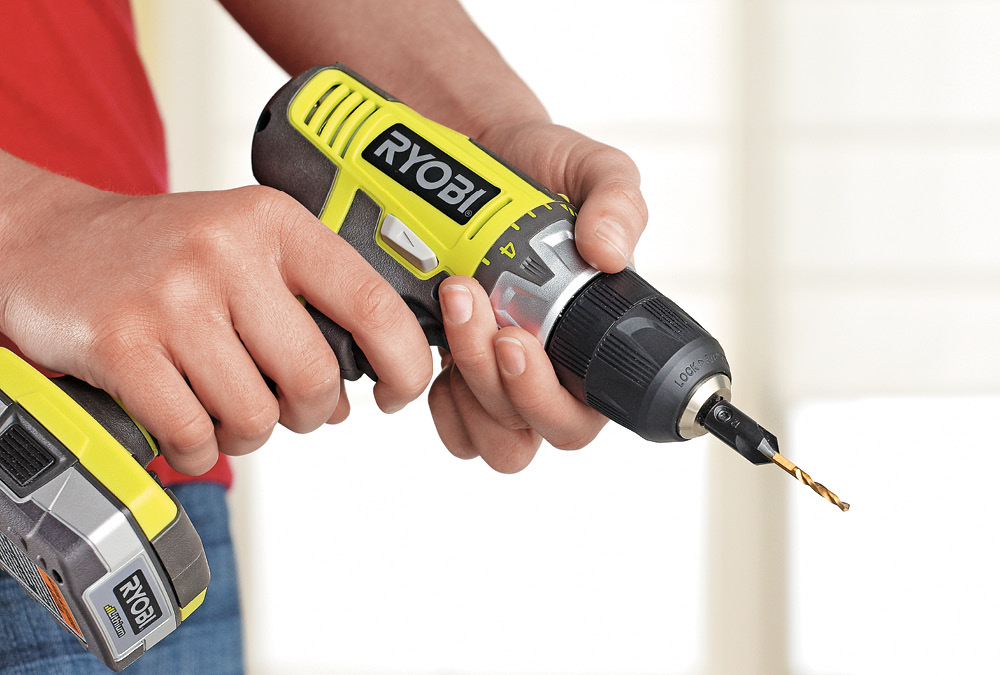
Keyless Chuck: Looking at a drill/driver, it's obvious where the bit goes. Old models needed a key to lock the bit in place, but yours likely has a keyless chuck that twists by hand to secure it.
Forward/Reverse Switch: Above the trigger, you'll find the forward/reverse switch. The forward setting is for drilling holes or driving screws, and the reverse switch lets you back out a jammed bit or remove screws.
The Clutch: The less intuitive component is that numbered ring — the clutch. It adjusts the torque, or rotating force, so a bit will power through material or automatically stop spinning once it meets a certain resistance. We'll get into this more later.
Variable-Speed Trigger: The last thing to note is that your tool probably has a variable-speed trigger. Like the gas pedal on a car, more applied pressure increases the rotating speed of the bit. This allows you to start out slowly to avoid slipping.
When it comes to drilling holes, you want to maximize the torque your drill/driver exerts, so the bit won't come to a screeching stop mid-way through your workpiece. You can do this by setting the clutch to the drill mode (photo below).
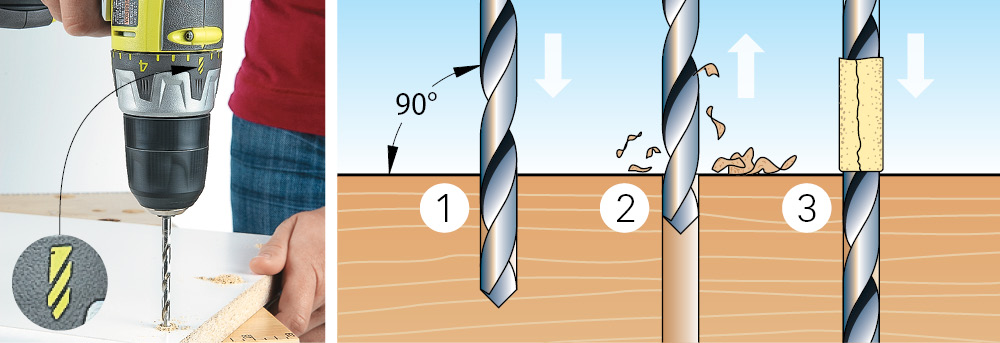
Drill Straight: Unless you intend to drill an angled hole, be sure to keep the bit perpendicular to your workpiece (example 1).
Relieve Sawdust: If the hole you're drilling is fairly deep, periodically pull the bit back to relieve the sawdust (example 2). This prevents sawdust from compacting around the bit and causing it to lock up.
Determine the Depth: When you need to drill a stopped hole (as opposed to one that goes all the way through), measure how much of the bit should enter the workpiece. Mark it with tape, so you know when to stop drilling (example 3).
Driving screws is easy once you get the hang of it. Of course, you need to use the right shape and size driver bit, so it doesn't wobble in the head of the screw. Also, be sure you aim straight. Aside from that, the only thing to address is the clutch setting. As mentioned before, the optimal setting for driving will seat a screw and stop the motor (photo below).
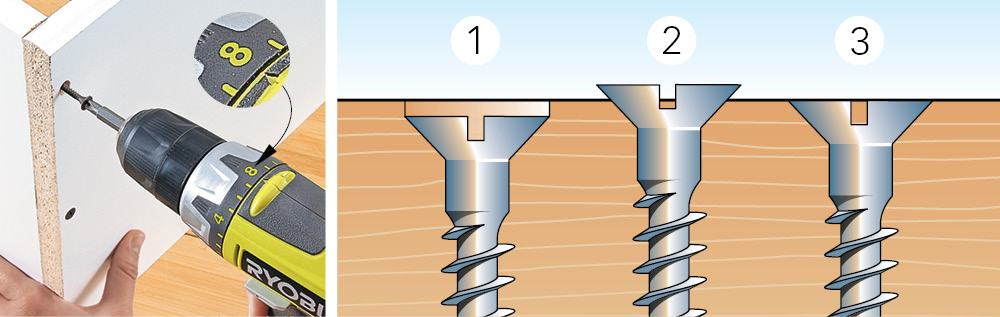
Too Powerful: If you drive a screw with too high of a clutch setting, you rely on your trigger finger and instinct. That makes stripping or over-driving it likely (example 1).
Too Weak: Too low of a setting, on the other hand, stops the motor before the screw is driven all the way in (example 2).
Just the Right Torque: Somewhere in between is a setting that will seat the screw flush just as the bit stops spinning (example 3). Because the right setting to use with various materials and screws depends on the drill, it's a good idea to grab some scrap material and get a feel for your tool's clutch.


