12/11/13, by Kim Downing
DIY Projects
Have you ever wondered what you would do if you ran out of space for that beloved holiday tree? Well that is exactly what happened to me this year!
It all started because our TV died. While most people would probably just replace the TV, my DIY prowess led me into what became a whole room makeover ... which led to more ideas ... and even more problems.
To start, I had a huge list of stuff to do: repaint, make a cabinet for components, add lighting ... the list went on and on. And what about the TV? Instead of replacing it, I decided to install a home theater projector and screen — something I have always wanted to do. As it turned out, I had enough room for a 110" screen. Yes!

Once the project was complete, we relaxed with a bowl of popcorn and a few movies. It's always a great feeling to be done with a big project.
Then came the holidays. Oh no! Where is the Christmas tree going to go? We could not cover up that new screen. Panic quickly set in, and before I knew it, I had yet another project to do:
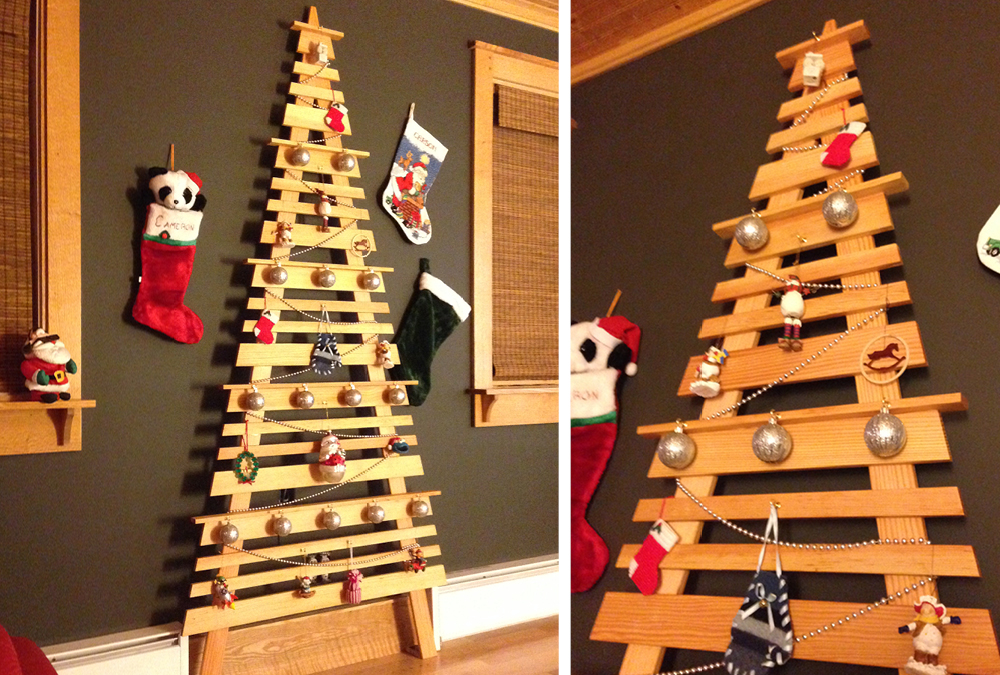
It’s actually a pretty cool idea. It’s decorative, it doesn’t need water, it doesn’t shed needles, it's cat proof (that has been a major source of entertainment and frustration over the years), and it stores flat in the closet when not in use.
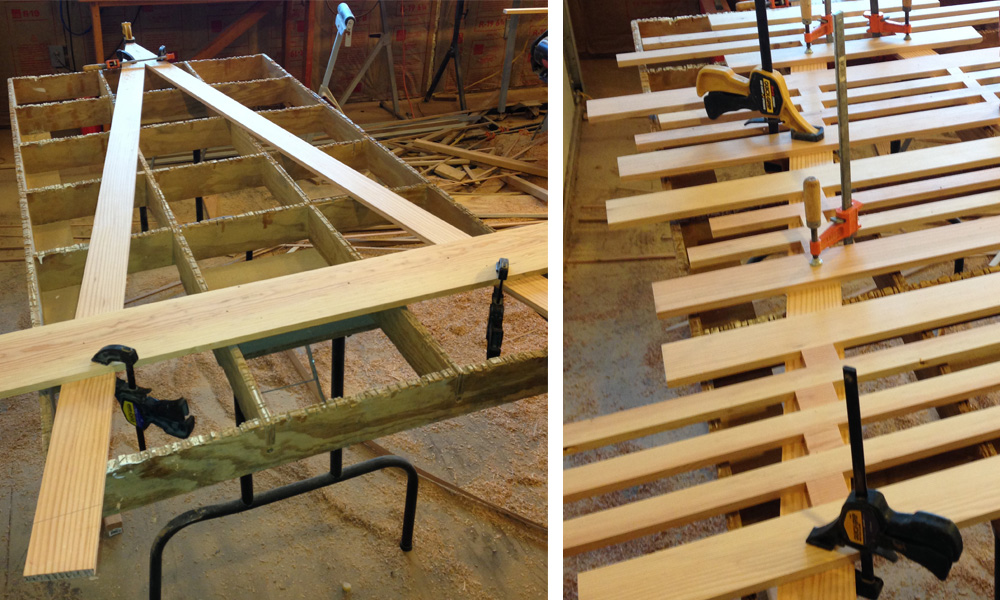
The tree ended up being very simple to make, too. I decided to make mine out of old scraps of 1x Douglas fir material I had laying around. To start, I just took a couple 8’ 1x4s and laid them out on a flat surface to the shape I wanted (see photo). I clamped them down and then just started arranging various widths of boards to see what I had to work with. Once I had my pattern down, I marked the order of the boards and removed them. To form the top of the tree, I marked the uprights and cut a long taper on each piece. I also trimmed the bottom ends.
Once that was done, I started applying boards with wood glue and a nail gun outfitted with 1" brads. After nailing on the first strip, I started using spacers to keep the spacing consistent. I didn’t worry about the ends hanging out at this point (I cut them off later). When I reached the top, I took a break to let the glue dry. Then, I marked a cut line across all of the boards on both sides and trimmed them with a jigsaw. The final touch was to add a narrow shelf along the tops of the wide boards, which provides a good place to install hooks for ornaments and decorations.
The natural look fit in with my decor, so after sanding the wood, I simply coated it with with linseed oil. You could paint or stain the project if you wanted.
Since the tree sits on the floor, installation was easy. I simply drove a single deck screw through the top of the tree into a wall stud.
This tree really has a nice look to it, and I'll definitely use it in years to come. Plus, I still get to see all of the movies I want without a tree being in the way.
Happy Holidays!


